How to Use Enable-RemoteMailbox in Powershell

Maintaining an efficient communication ecosystem is crucial for organizations of all sizes.
However, keeping track of all user mailboxes doesn't need to be a manual process - PowerShell is here to help.
Fortunately for organization administrators, the Enable-RemoteMailbox PowerShell command serves as the bridge that closes the gap between on-premises and cloud-based mailboxes, providing a seamless experience for both administrators and end-users.
Learn how to use this command right away.
What is Enable-RemoteMailbox in PowerShell?
Enable-RemoteMailbox is a PowerShell command used in Microsoft Exchange Server environments to enable a remote mailbox for a user account.
This cmdlet is used when a user account, created in an on-premises Active Directory environment, requires its associated mailbox to be hosted in Exchange Online (part of Microsoft 365) or another remote Exchange Server.
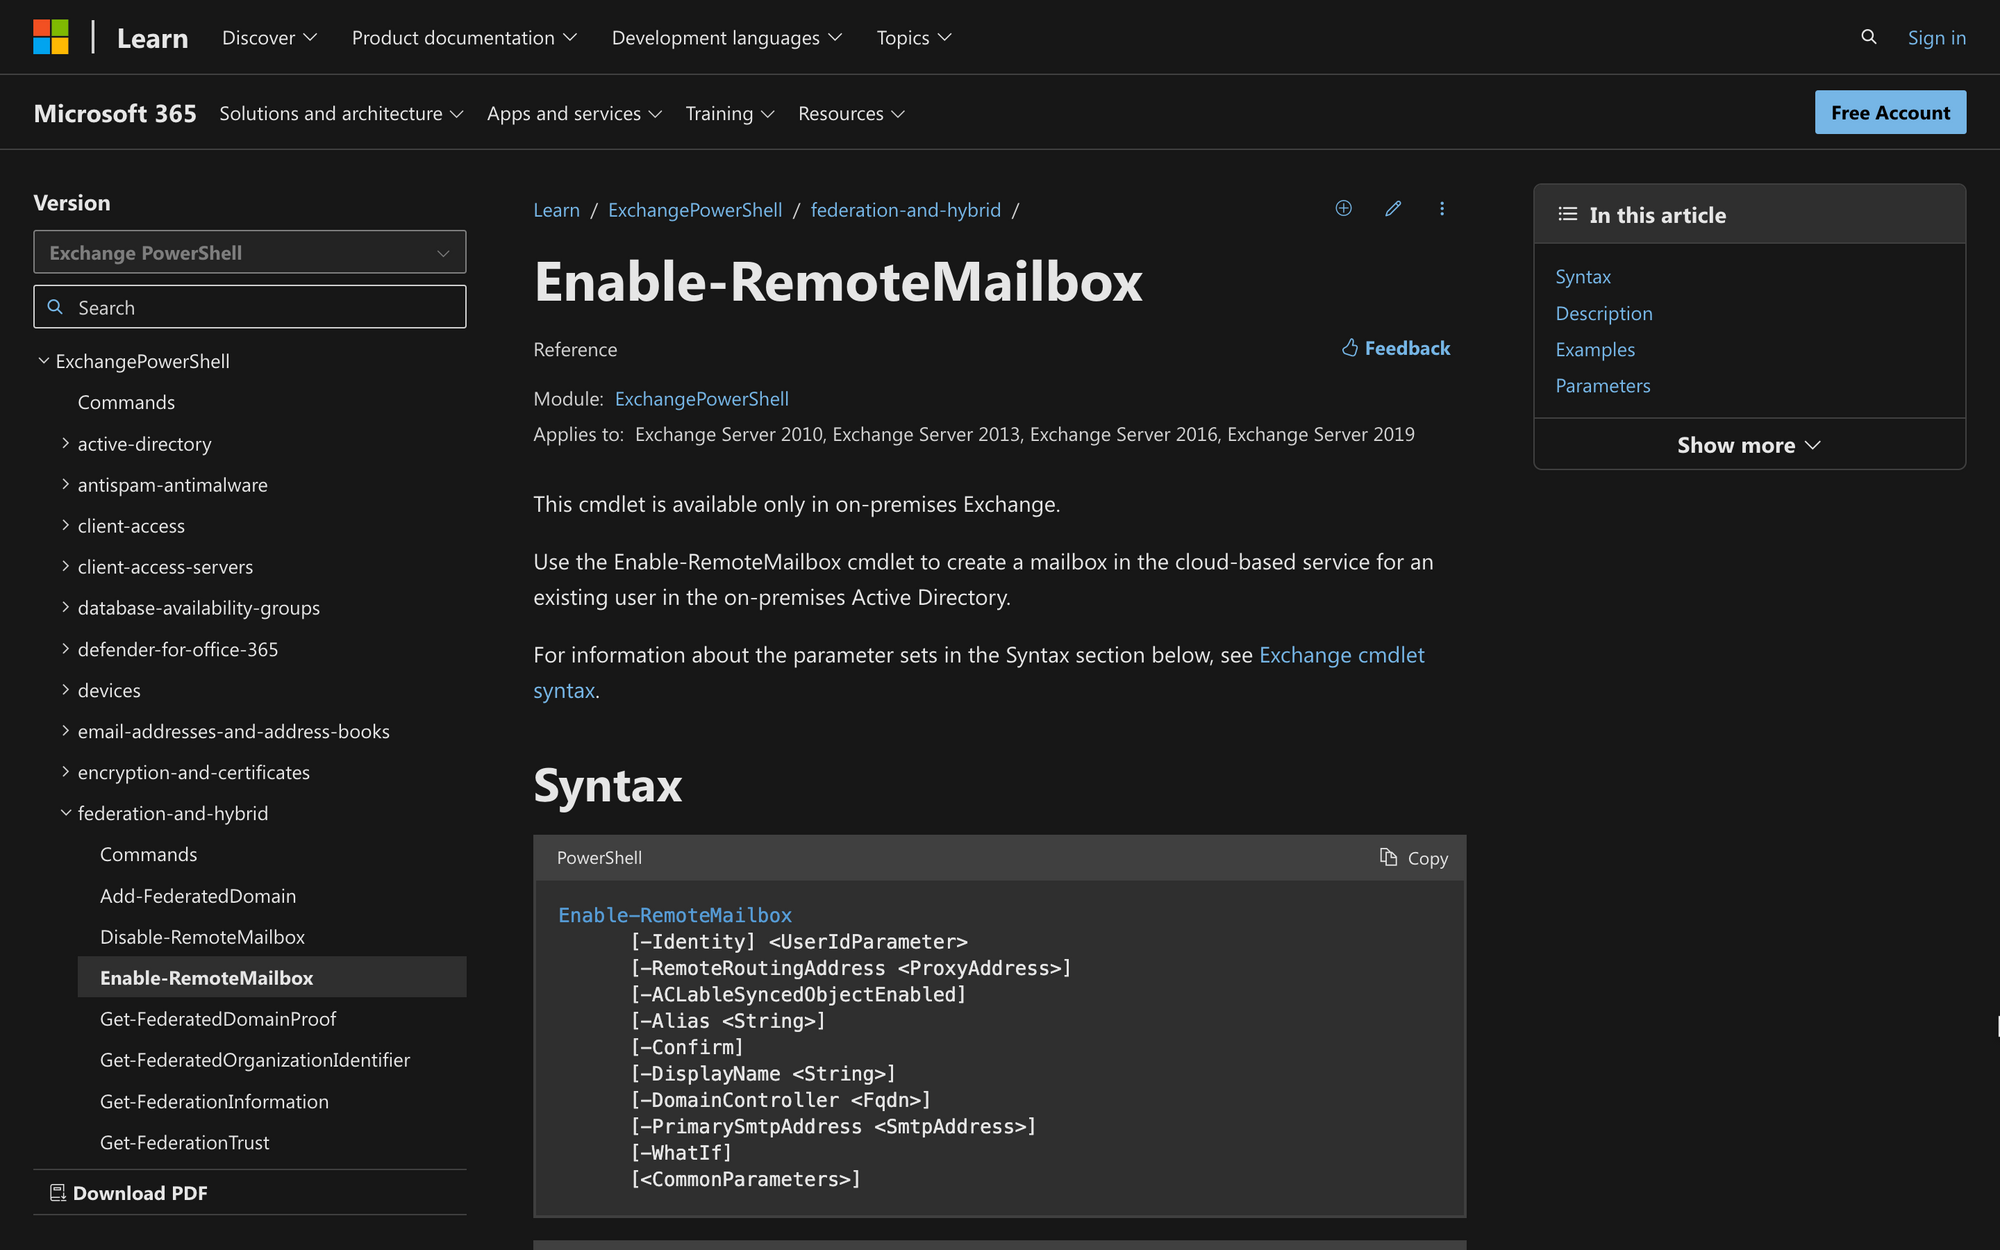
The syntax of Enable Remote Mailbox is the following:
Each of these syntax elements and parameters has a specific meaning:
- Identity: Specifies the user account for which you want to enable the remote mailbox. The <UserIdParameter> can be the user's alias, user principal name (UPN), distinguished name (DN), or other identifier;
- RemoteRoutingAddress: Specifies the email address to be used as the remote routing address for the mailbox. This is typically an external email address that is associated with the user's mailbox in the remote Exchange environment;
- ACLableSyncedObjectEnabled: This switch parameter enables ACLable synced objects. It is used in scenarios where Access Control Lists (ACLs) are applicable to synchronized objects;
- Alias: Specifies the alias for the mailbox. The alias is a unique identifier for the mailbox within the Exchange environment;
- Confirm: This switch parameter prompts you for confirmation before executing the command.
- DisplayName: Specifies the display name for the mailbox. The display name is the name that is shown in the address book and other user interfaces;
- DomainController: Specifies the fully qualified domain name (FQDN) of the domain controller that the cmdlet should connect to for its operation. This parameter is optional;
- PrimarySmtpAddress: Specifies the primary SMTP address for the mailbox. This is the main email address associated with the user's mailbox.
What Can You Use the Enable-RemoteMailbox Command For?
The Enable-RemoteMailbox Command works to establish a connection between an on-premises user account and a mailbox hosted in a remote Exchange environment, typically in the cloud.
Based on this, running this PowerShell script can bring the following benefits (among others):
- Mailbox Provisioning: It provisions a mailbox for the specified user account. This involves creating the necessary mailbox objects and attributes in the Exchange environment;
- Mailbox Association: It associates the user account in the on-premises Active Directory with the newly created mailbox in the remote Exchange environment. This linkage ensures that the user can access their mailbox seamlessly;
- Remote Mailbox Configuration: It configures settings for the mailbox on the remote Exchange server, such as storage quotas, permissions, and other mailbox-related attributes;
- Mail Flow Configuration: It sets up mail flow for the user's mailbox, allowing emails to be sent and received.
Prerequisites to Run the Enable-RemoteMailbox Script
Before running PowerShell commands, ensure compliance with the required permissions and prerequisites.
To check if you have full user permissions to run this command and modify resource mailbox parameters, follow these quick three steps:
- Connect to Exchange Online: Log in with admin credentials using a valid Microsoft Account to connect to Exchange Online PowerShell;
- Run Get-ManagementRole Command: Once logged in, execute the command: Get-ManagementRole -Cmdlet. Replace the -cmdlet part with "Enable-RemoteMailbox," so it will look like this: Get-ManagementRole Enable-RemoteMailbox;
- Check Required Permissions: After running the command, review the list of roles needed for Get-MessageTrace. For additional roles or permissions, contact your organization administrator for assistance.
How to Use Enable-RemoteMailbox in PowerShell
Now that you know what the Enable-RemoteMailbox command is for and its meaning, it's time to learn how to use it.
Follow these three quick steps to use Enable-RemoteMailbox in Exchange Online PowerShell.
Step 1: Connect to Exchange Online PowerShell
Start by running PowerShell on your computer and typing in the following command in the prompt window:
You'll be prompted to log into your Microsoft account using your credentials. Log into an account with sufficient admin permissions; otherwise, running the command as desired will be impossible.
Step 2: Identify the User and Mailbox Parameters
Now, make sure to have all the user and mailbox properties you'll use before running the command.
This means gathering essential information about the user, such as their alias, user principal name (UPN), or distinguished name (DN), and also ensuring that you have the necessary mailbox details like the remote routing address, alias, and display name.
Having this information in advance ensures a seamless and accurate execution of the Enable-RemoteMailbox command in PowerShell, preventing potential execution issues.
If you want to retrieve mail-related attributes, you can do so by running the Get-RemoteMailbox cmdlet before running Enable-RemoteMailbox on PowerShell.
Step 3: Run the Enable-RemoteMailbox Command in PowerShell
Once you have all the information needed to run the command, it's time to do it. Take a look at the following example:
The Enable-RemoteMailbox command in this example creates a remote mailbox for the user "James F" and associates it with the specified remote routing address "[email protected]."
The command can be modified further to match your needs, for example:
Running this command creates a remote mailbox for the user "James F," associating it with the remote routing address "[email protected]." It sets the mailbox alias to "JamesF" and the display name to "James Meeting," providing specific configurations during the mailbox creation process.
Summary: How to Use the Enable-RemoteMailbox Cmdlet in PowerShell
Enable-RemoteMailbox helps administrators manage mailboxes more efficiently - running this command will certainly save you more than a little bit of time. Let's do a quick recap of the three most important key points to finish with this article:
- The Enable-RemoteMailbox cmdlet serves as a powerful tool for centralizing mailbox management, facilitating cloud migrations, and enhancing overall control in Exchange environments, making it an invaluable asset for organizations leveraging PowerShell for email infrastructure;
- Before running this command, it's important to have all the mailbox and user attributes for the command to work smoothly. If you don't know this information, you can retrieve it by using Get-RemoteMailbox;
- In case the command is not working as expected, check if you have sufficient admin permission and make sure you are using the correct user and mailbox parameters. If you need further assistance, don't hesitate to contact your organization's administration.