How to Add-DistributionGroupMember with Powershell

Distribution groups in Microsoft Exchange Servers are very useful tools that allow organizations to streamline communication within organizations’ ecosystems.
However, constantly managing distribution groups is not easy, especially if your organization constantly has membership changes or new processes and permissions to implement.
Instead of following the defined process to create and set up distribution groups, we can leverage PowerShell codes to simplify the management of groups.
This article explains how to Add-DistributionGroupMember with PowerShell by following a few easy steps.
What is Add-Distribution Group Member in PowerShell?
Add-DistributionGroupMember is a PowerShell command used in the cloud-based service and Microsoft Exchange Server to add one or more members (usually users) to a distribution group.
The command is used to add distribution group members individually. However, the cmdlet can run alongside a script to add new members in bulk.
This allows us to have more control over a distribution group, as it’s easier to integrate new users into groups by modifying the parameters of the cmdlet.
A distribution group in Microsoft Exchange Online Servers is a feature that groups the email addresses of multiple users into a single, collective email address.
This way, when emails are sent to distribution groups, the email will also be sent to the multiple members of the groups individually.
Distribution groups are great for simplifying communication, managing multiple recipients within a single mailbox, organizing email messages into a single list, and accessing group email addresses more efficiently.
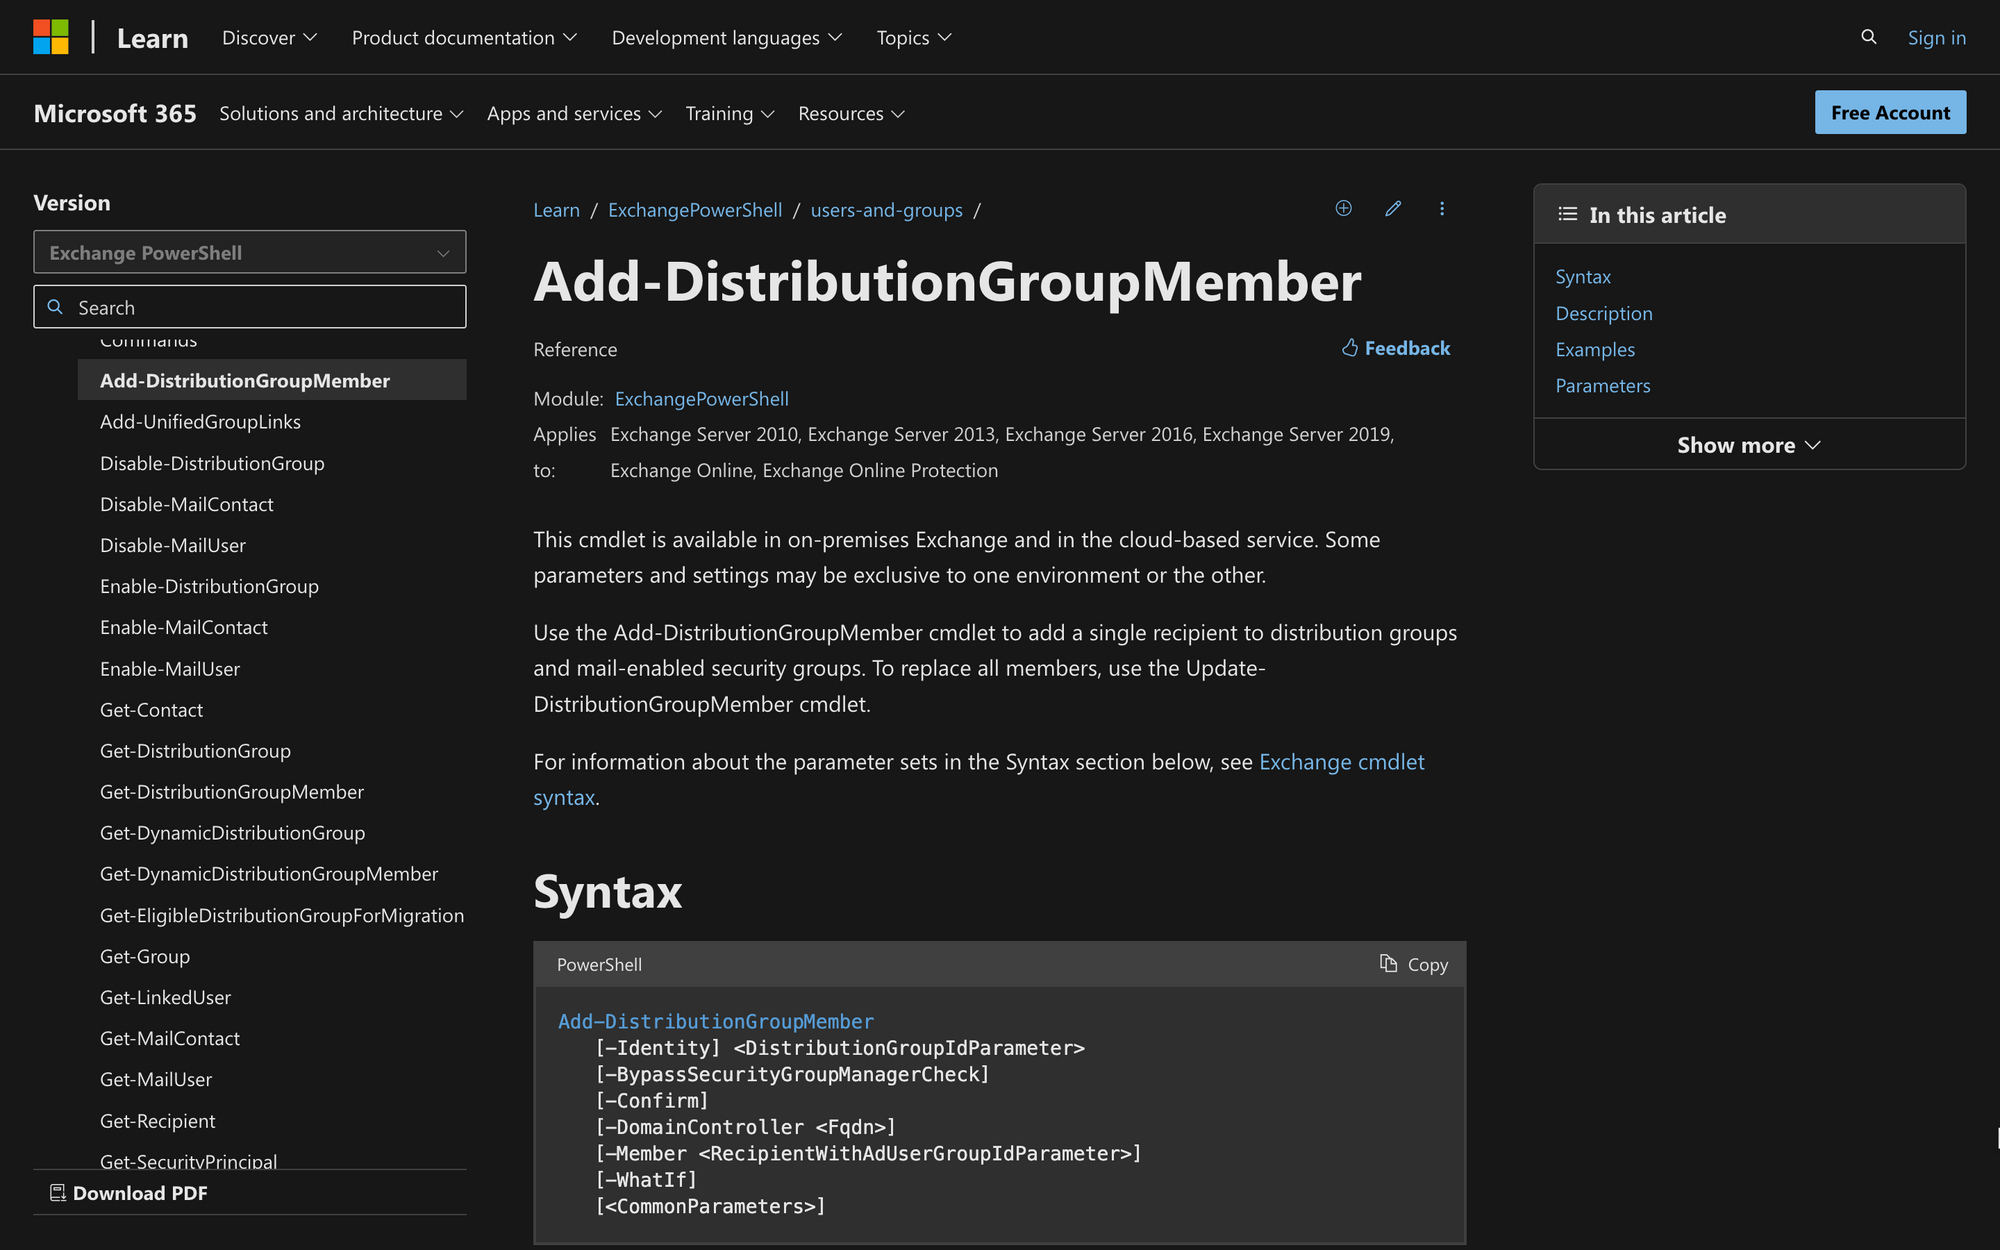
The Add-DistributionGroupMember command has the following syntax:
All of these values and properties have a meaning, and can be modified to change the output of the command before running it:
- Identity: The identity parameter specifies the group you want to modify. This value can be the distribution group name or any parameter that uniquely identifies the group;
- BypassSecurityGroupManagerCheck: This optional switch parameter allows you to bypass the security group manager check when adding members to the distribution group;
- Confirm: This parameter prompts you for confirmation before executing the cmdlet. If you include this parameter, PowerShell will ask for confirmation before adding members to the distribution group;
- DomainController: This is an optional parameter that specifies the Fully Qualified Domain Name (FQDN) of the domain controller that the cmdlet should contact when performing the operation;
- Member: This parameter is used to specify the members you want to add to the distribution group. A member is any mail-enabled security group user in your organization that can/should be added to the distribution group;
- WhatIf: WhatIf is a classic and optional parameter used to see what would happen if you ran the cmdlet without actually executing the operation;
- Common Parameters: Finally, these are common parameters that can be used with any PowerShell cmdlet for other purposes if needed.
Benefits of Using the Add-DistributionGroupMember Cmdlet in PowerShell
The Add-DistributionGroupMember cmdlet, like many other PowerShell scripts, provides Microsoft Exchange and Office 365 organizations with several benefits, such as the following:
- Efficient distribution group management - adding users to a distribution group is easier, quick, and time-effective;
- Bulk member addition - although the Add-DistributionGroupMember cmdlet is designed to add users one by one, it can also be modified to add users in bulk; more on that later;
- Scripting and automation - the Add-DistributionGroupMember cmdlet can be used to automate and modify otherwise time-consuming processes related to adding users to distribution groups;
- Streamlined communication - the cmdlet facilitates efficient communication within organizations by ensuring that messages sent to distribution groups reach all the relevant team members without the need to manually input individual email addresses;
- Adaptability to structure changes - if the structure of the organization changes, it’s possible to use the cmdlet to efficiently manage team structures, project groups, or departmental compositions within different distribution groups.
Prerequisites to Use the Add-DistributionGroup Member Cmdlet
It is worth noting that not all users within an organization are capable of running the Add-DistributionGroupMember cmdlet.
Instead, it’s necessary to comply with five main prerequisites:
- Access to PowerShell: It’s necessary to have access to PowerShell, specifically the Exchange Management Shell or Exchange Online PowerShell, in order to be able to run PowerShell cmdlets;
- Appropriate Permissions: Depending on your organization's policies and security settings, you should have the appropriate permissions to add members to distribution groups. Otherwise, it will be impossible to run the cmdlet;
- Ability to Run the Cmdlet: According to Microsoft, it’s necessary for all users who want to run cmdlets to use the Get-ManagementRole cmdlet first. This cmdlet’s output returns the specific permissions that users will need to run commands, depending on their organization's needs;
- Usernames or Email Addresses of Members: Since the cmdlet is used to add users to groups, it’s imperative to know the usernames or email addresses of the members you want to add. This information will later be used to replace the Member parameter within the command’s code;
- Knowledge of Distribution Groups: You should know the identity of the distribution group to which you want to add members. This could be the group's name, email address, or another unique identifier. Otherwise, the cmdlet will not execute as expected.
How to Add-DistributionGroupMember with PowerShell
Now, we are going to learn how to add group members individually by using the Add-DistributionGroupMember command in PowerShell.
To do so, follow these quick three steps.
Step 1: Connect to Exchange PowerShell
First, to execute Exchange-related cmdlets, we need to connect to the PowerShell environment of your organization.
To do this, open PowerShell on your computer, and on the command screen, execute the following command:
After executing the command, you will be prompted to log into your Microsoft account using your standard credentials.
Make sure that you are using the right account - otherwise, it will be impossible to run commands that require administrator permissions.
Step 2: Run the Add-DistributionGroupMember Command to Add a User
Now, we’ll start adding users by executing the command. After logging into your Microsoft account, run the command on your end.
For example, let’s take a look at the following command:
Executing this command will add James to the distribution group named “Conference.”
If you just need to add a few users, run the command multiple times until all users are added to the distribution list.
Step 3: Add a Specific User to the Distribution Group
Now, it’s time to check if the output of the command resulted as desired. To do this, check the distribution group, and see if the user was successfully added to it.
During this stage, it’s possible to troubleshoot the command by using two similar commands:
- To modify existing members use the Set-DistributionGroup cmdlet, which helps you identify permissions within a distribution group;
- Likewise, if you wish to replace all members, use the Update-DistributionGroupMember cmdlet.
Nonetheless, keep in mind that the Add-DistributionGroupMember command only adds new users - it can’t be used to change permissions or remove individuals from a distribution group.
How to Add Distribution Group Members in Bulk
The aforementioned steps work to add distribution group members one by one. Now, we are going to use this PowerShell Script to bulk add members to a distribution group list.
To do so, we are going to upload a CSF file that contains the names and parameters that uniquely identify bulk users.
In this case, the $UserList will store a CSV file that contains the name or identifiers of each recipient or user. The file can be created by running this command within the desired user list:
The CSV file contains all the mail contacts and information of an active directory. This means that the list of users stored on the file already exists.
Later, this list can be used to add multiple users to a distribution group like this:
Since the CSV file is already stored in the on-premises Exchange ecosystem, the command will start adding members in the $UserList to the group called “Distribution Group.”
The Add-DistributionGroupMember command can also be modified so the output adds a single user to several distribution lists.
This demonstrates how versatile and useful the Add-DistributionGroupMember command can be if modified to match your needs.
How to Remove Mail Users from Distribution Groups
Removing bulk users from a distribution list works similarly to adding users.
Instead of following the add-user process, we’ll use the Remove-DistributionGroupMember code cmdlet.
The Remove-DistributionGroupMember works like the following example:
Running this cmdlet removes the user James from the distribution group called “Conference.”
This way, it’s possible to revert changes and potential mistakes that occurred while using the Add-DistributionGroupMember cmdlet.
Summary: Adding Users to Distribution Groups Using the Add-DistributionGroupMember Cmdlet
Adding users to a distribution group is one of the most common and necessary tasks that organizations need to perform to maintain order and control over email processes.
You are ready to add users to a distribution group - make sure to check out the following final three tips before using the Add-DistributionGroupMember cmdlet:
- Check Necessary Permissions: Since the Add-DistributionGroupMember is a cmdlet that makes changes at an organizational level, it is important to ensure that you have the necessary permissions before running it;
- Run the Cmdlet: Check and acknowledge the syntax of the cmdlet before running to successfully add the specific users before running it;
- Use Other Commands to Modify Distribution Groups: You can set permissions, modify user lists, and remove users from distribution groups by using other PowerShell cmdlets. In any case, remember that the Add-DistributionGroupMember cmdlet only works to add users, not to modify or delete existing individuals.
FAQ
Why is the Add-Distribution Group Member Cmdlet Not Working?
If the Add-DistributionGroupMember command is not working, check for syntax errors, ensure that you have the necessary permissions to run the command, see if you are adding the correct user, and check if there’s any distribution group issue. If the problems persist, we suggest you contact your organization's administration for further assistance.